

I was selected to present a conference entitled "Learning the frontend without getting lost" at the 2023 edition of Le Web à Québec. This initiative had two objectives: to identify learning paths for developers who are stuck in their progression, and to draw up an inventory of resources that could be interesting for them.
To achieve this, I read numerous articles and books, and received support from a number of colleagues. My research was very fruitful, even too fruitful for the time allotted to me for the conference! Since I was only able to share a fraction of my findings at the conference, I have undertaken to write a series of articles highlighting the fruits of my labor.
Please note that the code examples are written in React.
_________________________________________________________
I learned how to test an application at university. The professors had done their job well, and I left with quite a lot of notions in my head: the various types of tests, mocking techniques (stubs, spies…). I'd even heard of test-driven development! All in all, I thought I was well equipped to deal with a real project once I hit the job market.
However, there was one avenue I hadn't anticipated, and reality hit me hard: how do you test a frontend application? As I mentioned, I had already written a multitude of tests at university, but they were all written for backend projects. So, how do you test what is rendered visually on a web page? How do you test the frontend?
Working on my first frontend project as a now recently-hired employee, I started testing EVERYTHING. To a simple white page with a title and a button would be associated a rich suite of tests: the font is this particular font, the content of the title is this particular content, the button appears correctly on the page, this button has this color and this value and acts like this when I click on it, and tutti quanti. Not a single line of code escaped my salutary desire to have a sufficiently tested application.

You get a test and you get a test! Everyone gets a test!
What should be tested in the user interface?
That's when a colleague approached me and told me I should slow down, warning me that it wasn't necessary to test an application so surgically.
Tests have the obvious advantage of giving us confidence in our functionality, but they also have a cost: they have to be written and maintained as the code changes. That's why it's important to write tests, but not too many either, at the risk of ending up with a not-so-great effort/cost ratio.
One of the most common causes of this imbalance is effort put into testing implementation details. To avoid falling into a situation where testing slows down development more than it provides confidence, consider the adage that says all roads lead to Rome, because in programming, nothing could be truer: give me a feature to implement and I'll show you a multitude of ways to achieve it. It's therefore counterproductive to use tests to ensure that one path has been taken rather than another one.
This means the following instruction is essential. Post it on your fridge, embroider it on your favorite sweater, get it tattooed on your chest:
When testing the user interface of a frontend application, you need to test what users can experience, i.e. the behavior of components rendered on the page and the side effects of an action.
In other words, as Kent C. Dodds, author of the React Testing Library:
The more your tests resemble the way your software is used, the more confidence they can give you. [...] Think less about the code you are testing and more about the use cases that code supports.
* source: Testing Implementation Details
Test Coverage
When Dodds mentions worrying about tested use cases rather than tested code, he's referring to test coverage. Many organizations promote 100% coverage, which means that 100% of the program's lines of code are tested.
It has to be said that the clarity of this metric and the fact that it is so explicit make it an attractive metric. However, it does not indicate which lines should be tested first, nor does it ensure that all possible use cases are covered by the tests.
In this example, taken from a presentation given by Kent C.Dodds, a simple function is tested, which transforms the value received as a parameter into an array.
// transforme un argument en array
function arrayify(value: unknown) {
  // simple retour si l'argument était déjà un array
  if (Array.isArray(value)) return value;

  // sinon, l’argument, si truthy, est mis dans un array
  return [value].filter(Boolean);
}


// teste la première ligne (if)
test("returns an array if given an array", () => {
  expect(arrayify(["cat", "dog"]).toEqual(["cat", "dog"]);
});


// teste la seconde ligne (return)
test("returns an array with the given argument if not an array", () => {
  expect(arrayify("Leopard")).toEqual(["Leopard"]);
});
The first test focuses on the first line of the function, while the second focuses on the second line. A code coverage tool would then indicate that the code is 100% covered by tests. The unskilled developer would then be satisfied and move on to another call. But can you identify which method use case is not tested?
The answer:
test("return an empty array if given a falsy value", () => {
  expect(arrayify()).toEqual([]);
});
Testing use cases
"Think less about the code you are testing and more about the use cases that code supports.", says Kent C. Dodds. To achieve this, there are two possible approaches:
- test interactions with what is visually rendered and the side-effects of these interactions (for example, what happens if a user clicks on a button) ;
- test side-effects that happen depending on the values passed to component properties (for example, if the value true is passed for an isLoading property).
In fact, it's important to test the user interface (the UI) in accordance with the "black box" concept (i.e. to check that the output obtained corresponds to the input given). This means avoiding testing lifecycle methods (often hooks with names like beforeCreate, mounted, beforeUnmount), event handlers (e.g. onclick or onchange), internal component states or other implementation details.
Stick to inputs (values passed to properties or actions performed on the UI) and outputs (effects visible in the UI).
A concrete example for a better understanding
Here's a simple case in point: the integration of a simple button, the CustomButton, which runs an action when the user clicks on it. It can be disabled under certain conditions.

A blue button reading UPLOAD
const CustomButton = ({ value, onClick, disabled }: Props) => {
  // …

  return (
    <button onclick={onClick} disabled={disabled}>
      { value.toUpperCase() }
    </button>
  );
};


// utilisation du composant CustomButton
// si un fichier a préalablement été sélectionné, le bouton est cliquable
// au clic, la fonction uploadFile est appelée

const UploadFilePage = () => {
  // ...

  return (
    <CustomButton
      value="upload"
      onClick={uploadFile}
      disabled={!selectedFileToUpload}
    />
  );
};
Before analyzing the following cases, remember one last time the sacrosanct principle of testing: "You have to test interactions and side effects."

You need to test interactions and side effects
Testing properties passed to a component
While it's generally a good idea to test what happens according to the values you pass to component properties, it's not necessary to test them all. The most relevant are those related to interactions and side effects. Those that simply display a message, for example, are generally quite trivial and don't necessarily require testing.
❌ 1st Case
If the value property is set to "upload", the button displays the text "UPLOAD".
In the light of what was said in the previous paragraph, it's even less important that a test suite ensures that a text is displayed in upper case!
✅ 2nd Case
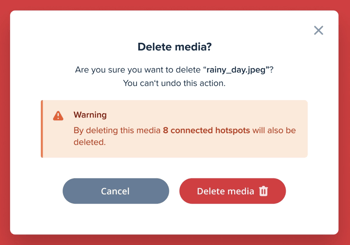
In a modal deletion confirmation window, the name of the item to be deleted is displayed.
Bear in mind, however, that there may be certain scenarios that one might want to include in test suites regardless. A good example of this is to ensure that a warning message contains the name of the file that will be deleted if the user clicks on the confirmation button. This is a destructive action and it is desirable to ensure that the user is well informed of what he is about to do.
In short, the important thing to remember is not that testing this kind of property is strictly forbidden, but rather that it really isn't necessary to test it systematically.
✅ 3rd Case
The button is disabled or not, depending on whether or not a file is selected (the disabled property is set to true or false).
In this case, the effect of passing one value or another to the property affects the way the user can use the product, so it's a side-effect we're keen to test.
Style Testing
❌ 1st Case
The button is blue
In addition to not being an interaction or a side-effect, styling is often fragile, as it can change over the course of several iterations or depending on the device on which the user is browsing. Also, it doesn’t matter if a margin measures 10 or 12 pixels, we don't want to be alerted if a minor change occurs about it.
✅ Cas 2
The button is red in case of error
Style is rarely tested, but there can be a few interesting cases. In this case, it's an event-driven effect designed to convey information to the user, which is generally what we want to include in our tests.
Test the appearance and interactivity of elements
❌ 1st Case
The button appears on the page
A good test suite necessarily validates that a component rendered on a page acts as expected when the user interacts with it. Therefore, by default, these tests require the presence of said components to be detected. A test that only validates the presence of a component in the page is therefore redundant, since the rest of your test suite will necessarily fail if the component isn't present anyway. In short, even without this test, a developer who deletes a component will be notified of the effects of his action via the other tests
✅ 2nd Case
The button appears on the page if...
This being said, since we want to test the side-effects, it is relevant to test the conditional visual rendering of a component if one wants to do so. A common example of this is testing the appearance of an error message on the screen in the event of an error.
✅ 3rd Case
When the user clicks on the button, X occurs
There's not much more to say other than that this is exactly the type of case you'd want to see in a test suite when you consider that you're testing a use case. It's a test very close to the way the application is used by users.
How do you test all this?
You're probably familiar with the test pyramid, which states that projects should primarily include unit tests, then some integration tests and, finally, a handful of end-to-end tests. But have you ever heard of the testing trophy?
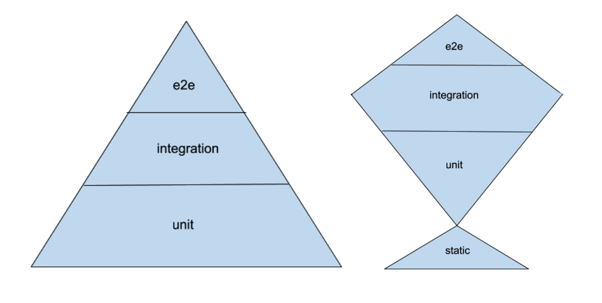
The test pyramid and the testing trophy
The testing trophy idea comes from a tweet from Guillermo Rough, author of Socket.io and other JavaScript tools.

Write tests. Not too many. Mostly integration.
"Write tests. Not too many." We just explained why.
But in this article, Kent C. Dodds justifies the last part of this mantra: it's true that unit tests run faster and are easier to write and maintain than other types of tests. That said, the higher up the pyramid we go, the more complete and reliable our tests are.
Then, he adds:
“ So while having some unit tests to verify these pieces work in isolation isn't a bad thing, it doesn't do you any good if you don't also verify that they work together properly. And you'll find that by testing that they work together properly, you often don't need to bother testing them in isolation.”
What are integration tests and why should you choose them?
There are generally three main types of test:
- end-to-end testing, which tests a critical user path from the start to the end (using tools such as Cypress E2E, Playwright and Selenium);
- integration testing, which tests a minor user path within a single page (using tools such as Cypress Components Testing and Testing Library);
- unit tests, which test an element in isolation (using tools such as Jest and Vitest).
By way of illustration, an end-to-end test applied to an app in which a user can create to-dos and generate a to-do list would test this complete path:
- the user logs into his account;
- his to-do list is displayed on the home page;
- the users click on the "delete" button of one of these tasks;
- a modal window opens;
- the user clicks on "yes" to proceed;
- the list no longer contains this task
On the other hand, an integration test is less extensive and checks that the glue between two components is present and that they interact well together.
// interaction entre plusieurs composants (bouton, modale)

test("when I click on DELETE, the modal opens", async () => {
  renderHomePage();

  // quand je clique sur DELETE
  const user = userEvent.setup();
  const button = getByRole("button", {name: "DELETE"});
  await user.click(button);

  // la fenêtre modale s’ouvre
  const modal = getByRole("heading", {name: "Delete File"});
  expect(modal).toBeVisible();
});
Without these higher-level tests, it is not possible to guarantee that the application actually works as intended. Unit tests alone are not enough to provide this confidence.
You need to be convinced?


expect(umbrellaOpens).toBe(true) (source: @erinfranmc)
Are integration tests enough for the whole code?
Does this mean the end of unit testing? Is it time to consign them to the dustbin, along with our old shoes and holey sweaters?
As we've just said, when it comes to user interface testing, a large proportion of the front-end programming world seems to prioritize integration testing over unit testing. That being said, an application generally also contains business logic and calls on various external services.
To achieve a maintainable architecture, the business domain must remain independent of the user interface. We therefore want to avoid testing it through visual rendering. Secondly, these elements often come with their own set of exceptions and edge cases, which need to be tested via unit tests.
Within a smart frontend architecture, business domain and external resources, which are isolated in separate files rather than being all intertwined through the code responsible for visual rendering, are easy to unit test.
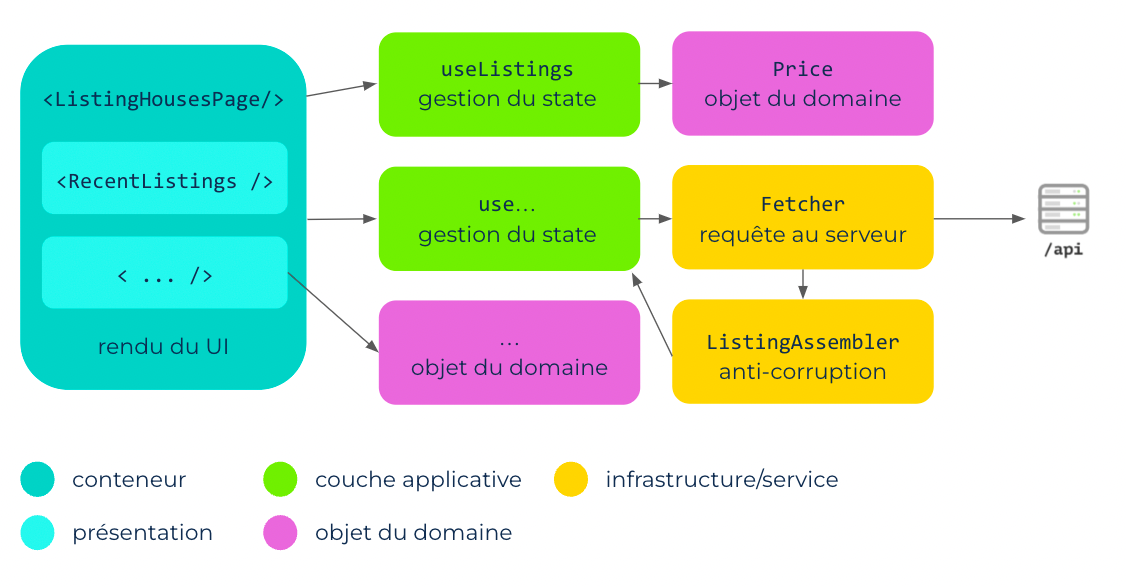
Domain objects and calls to external services are separated in files, outside the UI (source: https://martinfowler.com/articles/modularizing-react-apps.html )
If they are not isolated, it becomes difficult to test them without going through the visual rendering of the components, which makes testing more complex and costly. Here's an example to illustrate the point. In both tests, the method getValueDependingOnCondition(), used in a component named HomePage, is tested.
// ** 1ER CAS: LA LOGIQUE EST INTÉGRÉE AU UI **

// composant testé

const HomePage = ({ value, onClick, disabled }: Props) => {
  // ...

  const getValueDependingOnCondition = (condition: boolean) => {
    // si true, la string A
    // si false, la string B
  }

  return (
    <p>You picked { getValueDependingOnCondition(condition) }</p>
  );
};


// l’un des tests qui valident le comportement attendu

test("when condition is true, then A is displayed", async () => {
  // rendu visuel de la page
  renderHomePage();

  // actions pour que la condition testée (true) se réalise
  const user = userEvent.setup();
  const button = getByRole("button", {name: "activate true condition"});
  await user.click(button);

  // il faut passer par le rendu pour valider le comportement attendu
  const displayedTextA = getByText("You picked A");
  expect(displayedTextA).toBeVisible();
});
In this first case, the test is quite complex. In a scenario where there might be several edge cases and exceptions to test, or if the method could return even more different results, the test suite would quickly be inflated by all these different scenarios. However, by isolating all this logic, as in the following example, it is sufficient to test only the relevant cases in the UI integration tests and to test all the various possibilities, all the edge cases or even all the more problematic cases in the unit tests of the business domain service or object.
// ** 2E CAS: LA LOGIQUE EST ISOLÉE DANS UN FICHIER SÉPARÉ **

// fichier à part où la logique se trouve

class Picker {
  getValueDependingOnCondition(condition: boolean) {
    // si X, retourne la string A
    // si Y, retourne la string B
  }
};


// composant qui utilise la logique

const HomePage = ({ value, onClick, disabled }: Props) => {
  // …
  const picker = new Picker();

  return (
    <p>You picked { picker.getValueBasedOnCondition(condition) }</p>
  );
};


// le même test que précédemment, qui valide le comportement attendu

test("when condition is true, then A is returned", async () => {
  // la méthode est maintenant directement testée
  const picker = new Picker();

  // plus besoin du UI pour contrôler la valeur de la condition
  const actualValue = picker.getValueBasedOnCondition(true);

  expect(actualValue).toEqual("A");
});
Unlike its predecessor, this test does not have to go through intermediaries (visual rendering) to confirm that the desired behavior has been achieved. This gives you the freedom to test all possible cases in depth.
A few last tips for the road
Use domain-specific language
This article written by one of my colleagues explains the concept well, but to summarize, it's all about hiding the details related to a specific library in methods or named objects that more explicitly describe the business domain, i.e. the components visible in the pages and the actions performed.
In the following scenario, the tested component, TodoList, is a to-do list (shocking, I know). The component makes a call to the backend via a method named getTodos() to obtain the data to be displayed (which implies that a mock must be used in the tests to control the data received during this call). Finally, the TodoList component also has a "COUNT TODOS" button, which displays an on-screen indication of the number of tasks in the list.

A list of tasks and a button to count the number of tasks
Here's a first test written using the React Testing Library and the user-event library.
// test sans l’usage du langage spécifique au domaine

test("given todos, when clicking on COUNT TODOS, then the quantity of todos is displayed", async () => {
    // GIVEN
    const fetchedTodos= [ /* array de todos */];

    // mock du client qui imite un appel API et retourne des données
    vi.spyOn(
     TodosClient.prototype,
     "getTodos"
    ).mockResolvedValue(fetchedTodos);

    // rendu visuel de la page pour tester les comportements
    render(<TodoList />);

    // WHEN
    // clic sur le bouton "COUNT TODOS"
    const user = userEvent.setup();
    const button = screen.getByRole("button", {name: "COUNT TODOS"});
    await user.click(button);

    // THEN
    // le nombre de todos est affiché à l’écran
    const todosQty = screen.getByText(fetchedTodos.length.toString());
    expect(`${todosQty} todos`).toBeVisible();
});
Here's the same test, but this time the language used makes the various steps more explicit:
- the visual elements of the interface have been brought together in the ui object to simplify testing;
- a method has been created for the given todos condition;
- the three methods at the end of the file ensure that the tests focus on the domain rather than the libraries used.
// test avec l’usage du langage spécifique au domaine

const ui = {
  countTodosButton: screen.getByRole("button", {name: "COUNT TODOS"}),
  countText: (todosQty: string) => screen.getByText(`${todosQty} todos`)
};


test("given todos, when clicking on COUNT TODOS, then the quantity of todos is displayed", async () => {
  // GIVEN
  const fetchedTodos= [/* ... */];
  givenTodos(fetchedTodos);
  renderTodoList();

  // WHEN
  clickOnCountTodosButton();

  // THEN
  expect(ui.countText(fetchedTodos.length.toString()).toBeVisible();
});


function givenTodos(todos: Todo[]) {
  vi.spyOn(
   TodosClient.prototype,
   "getTodos"
  ).mockResolvedValue(todos);
}

function renderTodoList() {
  render(<TodoList />);
}

function clickOnCountTodosButton() {
  const user = userEvent.setup();
  await user.click(ui.countTodosButton);
}
Use utility methods
We are still in the to-dos app, this time we're testing the page that displays the details of a specific task, TodoDetailsPage, when clicked. The component under test has a property whose value it receives from its parent: the to-do whose details will be displayed.
When the page is opened, some information must be downloaded. During the waiting time, a spinner is displayed.
To be able to test the various scenarios, we then need to render this component with various values passed to the todo property, some of which will be valid and others invalid. To make the task easier, it may be appropriate to create a utility method that will facilitate the creation of to-dos from test to test. TypeScript also offers the Partial utility type and the spread operator (...) to make things even simpler.
const ui = { /* ... */ }

// pour ce test, la valeur du todo n’importe pas
// on utilise createTodo telle quelle sans lui passer d’arguments

test("given todo is loading, the a spinner is displayed", async () => {
  givenLoading();
  renderTodoDetailsPage(createTodo());

  expect(ui.spinner).toBeVisible();
});


// la date du todo doit être expirée
// createTodo est utilisée avec un todo partiel
// qui inclut spécifiquement ce qui est pertinent: dueFor

test("given todo with expired date, error message is shown", async () => {
  const expiredDateTodo = createTodo({ dueFor: new Date("1900-01-01") });
  renderTodoDetailsPage(expiredDateTodo);

  expect(ui.expiredDateWarningMessage).toBeVisible();
});


function createTodo(todo?: Partial<Todo>) {
  return {
    description: "any valid description",
    dueFor: new Date(),
    assignedTo: "any valid person",
    ...todo // spread operator
  };
}

function renderTodoDetailsPage(todo: Todo) {
  render(<TodoDetails todo={todo} />);
}

// ...
Using the Builder pattern rather than utility methods
If a utility method proves too complex (or simply because you feel like it), it may be worth implementing a builder instead. The following example was inspired by a LinkedIn publication by Nicolas Carlo.
// test sans le builder

test("given todos with same due date and one is urgent, then...", () => {
  const urgentTodo = {
    id: "an id",
    description: "finish homework",
    dueFor: new Date(A_DATE),
    assignedTo: "someone",
    responsible: "a person",
    isUrgent: true,
    difficultyLevel: DifficultyLevel.HARD
  };
  const notUrgentTodo = {
    id: "another id",
    description: "clean bathroom",
    dueFor: new Date(A_DATE),
    assignedTo: "another person",
    responsible: "someone else",
    isUrgent: false,
    difficultyLevel: DifficultyLevel.MEDIUM
  };

  // la création de ces objets prend beaucoup de lignes
  // en outre, plusieurs des champs du type Todo pourraient être cachés
  // car ils n'importent pas dans le contexte du test

  const urgentTodos = getUrgentTodos([urgentTodo, notUrgentTodo]);

  expect(urgentTodos).not.toContain(notUrgentTodo);
});


// même test, mais avec un builder
test("given todos with same due date and one is urgent, then...", () => {
  const urgentTodo = createTodo()
    .withId("an id")
    .withDueFor(A_DATE)
    .isUrgent()
    .build()  // retourne la valeur

  const notUrgentTodo = createTodo()
    .withId("another id")
    .withDueFor(A_DATE)
    .isNotUrgent()
    .build()

  const urgentTodos = getUrgentTodos([urgentTodo, notUrgentTodo]);

  expect(urgentTodos).not.toContain(notUrgentTodo);
});
Avoid too much nesting
Many JavaScript frontend test libraries have a similar syntax: describe, test/it, beforeEach, afterEach, etc.
describe("XYZ Page", () => {
  beforeEach(() => {
    // ...
  });

  afterEach(() => {
    // ...
  });

  test("...", () => {
    // ...
  });

  test("...", () => {
    // ...
  });
};
Some encourage the following syntax to implement the "given/when/then" (or "arrange/act/assert") format, putting the given and when in describe blocks, which also forces the when action to be performed in a beforeEach block.
describe("Todo List", () => {
  describe("given todos", () => {

    const fetchedTodos= [/* ... */];
    givenTodos(fetchedTodos);
    renderTodoList();

    describe("when clicking on COUNT TODOS", () => {
      beforeEach(() => {
        clickOnCountTodosButton();
      });

      it("displays the quantity of todos", () => {
        expect(
          ui.countText(fetchedTodos.length.toString()
        ).toBeVisible();
      });
    }
  }
};
Although this practice persists in many organizations, it is not recommended for reasons of readability and maintainability. Instead, we prefer to avoid boilerplates wherever possible. This article by Kent C. Dodds, as well as this article by my colleague, deal with this subject in greater detail.
test("given todos, when clicking on COUNT TODOS, then the quantity of todos is displayed", () => {

  const fetchedTodos= [/* ... */];
  givenTodos(fetchedTodos);
  renderTodoList();

  clickOnCountTodosButton();

  expect(ui.countText(fetchedTodos.length.toString()).toBeVisible();
});
Et si votre projet était subventionné?
Vous pourriez financer jusqu'à 50% de votre projet d'intelligence artificielle grâce aux programmes de subventions.